Webpack 4 Fundamentals
- Why Webpack?
- History of Modules
- Introducing Webpack
- Webpack from Scratch
- Webpack Core Concepts
- Using Plugins
Why Webpack?
History of Modules
- Originally, all required JavaScript files would be folded into one monolithic 'global' file. Problems with this approach included the size, readability issues and scope collisions.
- IIFE (Immediately Invoked Function Expression): Modular code could be wrapped in an IIFE, resolving some scope issues in monolithic JS files. e.g.
const foo = (function() {<...>})(1).
- CommonJS: Introduced 'require' syntax, e.g.
const path = require('path'). Eventually supported by Node, where npm enabled mass distribution of JS modules. Cons of CommonJS:
- No browser support
- No live bindings, creating issues with circular references
- Slow module syncing resolution loading times
- ESM (EcmaScript Module format):
import * as utils from 'utils';. Slow in the browser
Introducing Webpack
- Webpack 4 is a module bundler that:
- Lets you write any module format and compiles them to work in the browser
- Supports code splitting / static async bundling
- Lazy loading
- Has a rich, vast, ecosystem
- Most performant way to ship JavaScript today (i.e. in 2018)!
- Can be used via a
webpack.config.js file, the webpack CLI, Node API
Webpack from Scratch
- In
package.json, add some scripts:
"scripts": {
  "build": "node ./node_modules/webpack/bin/webpack.js",
  "webpack-dev-server": "webpack-dev-server",
  "debug": "node --inspect --inspect-brk ./node_modules/webpack/bin/webpack.js",
  "prod": "npm run build -- --env.mode production",
  "dev": "npm run build -- --env.mode development --watch --hot",
  "prod:debug": "npm run debug -- --env.mode production",
  "dev:debug": "npm run debug -- --env.mode development",
  "debugthis": "node --inspect --inspect-brk ./src/index.js"
},
npm run debugthis will run index.js and start a debug server with a breakpoint at the first line- By default,
npm run build will output the resulting minified, bundled file to ./dist/main.js
npm run dev will build a dependency graph in real-time in the terminal- You cannot use CommonJS and ES syntax in the same file
- CommonJS export usage example:
const red = "color: red;";
const blue = "color: blue;";
exports.red = red;
exports.blue = blue;
module.exports = (color) => {return `color: ${color}`};
- Exports are best put at the bottom of your files
- To configure Webpack's behaviour use a
webpack.config.js file. Webpack applies its defaults after it looks at the config.
Webpack Core Concepts
- Entry: First JS file to load to start the app. Used as the root of Webpack's graph
- Output: Tells webpack where and how to distribute bundles. Works with entry.
- Loaders and Rules: Tells webpack how to interpret and translate files. Transformed on a per-file basis before adding to the dependency graph. Loaders are also JavaScript modules that take the source file and returns it in a modified state.
Loader format:
rules: [
{
test: regex,
use: (Array|String|Function),
include: RegExp[],
exclude: RegExp[],
issuer: (RegExp|String)[],
enforce: "pre"|"post",
},
]
- Plugins: Add additional functionality to compilations (optimized bundled modules).
const webpack = require('webpack');
const BellOnBundlerErrorPlugin = require('bell-on-error');
module.exports = ({ passedInVariable }) => {
console.log(passedInVariable);
return {
entry: '/src/main.js',
output: {
path: './dist',
filename: './bundle.js'
},
rules: [
{test: /\.ts$\, use: 'ts-loader'},
{test: /\.js$\, use: 'babel-loader'},
{test: /\.css$\, use: 'css-loader'},
],
plugins: [
new BellOnBundlerErrorPlugin(),
new webpack.ProgressPlugin()
]
}
}
webpack-web-server generates a bundle in memory, serves information up to an Express.js webserver. Reloads upon file changes. (must include new HTMLWebpackPlugin() in plugin list)- Webpack configuration files can be split and merged using the
webpack-merge package:
const { merge } = require('webpack-merge');
module.exports = () => {
  return merge(object1, object2, object3, ...);
}
- Output filenames can be hashed with special string parsing, e.g. setting the property
filename: "[hash].js"
Using Plugins
- To use css with webpack:
- Use the rule
{test: /\.css$\, use: ['style-loader', 'css-loader']} (includes css in js file)
- OR use the rule
{test: /\.css$\, use: [MiniCssExtractPlugin.loader, "css-loader"]} after requiring "mini-css-extract-plugin" (includes css in dist as its own file).
- In a JS file
import "./my-css-file.css
- Hot Module Replacement:
- Exchanges, adds or removes modules while an application is running without a full reload, retaining application state.
- Instantly updates the browser when modifications are made to CSS/JS in the source code
- To use images with webpack (imported as a base-64 data URI by default):
- Put an image in your
src folder
- Use the rule
{test: /\.jpe?g/, use: [{loader: "url-loader", options: {limit: 5000}}]}. The limit option here specifies that only files under 5000 bytes should be encoded. Larger files will just be included in the dist folder.
- In a JS file
import ./my-image.jpeg
- To apply webpack preset files, create the below JS file, add
applyPresets({mode, presets}) to your webpack.config.js and then add --env.presets <presetName> to the relevant scripts in your package.json. Presets should be called /presets/webpack.<presetName>.js
const webpackMerge = require("webpack-merge");
const applyPresets = env => {
const {presets} = env;
const mergedPresets = [].concat(...[presets]);
const mergedConfigs = mergedPresets.map(
presetName => require(`./presets/webpack.${presetName}`)(env)
);
return webpackMerge({}, ...mergedConfigs);
}
module.exports = applyPresets;
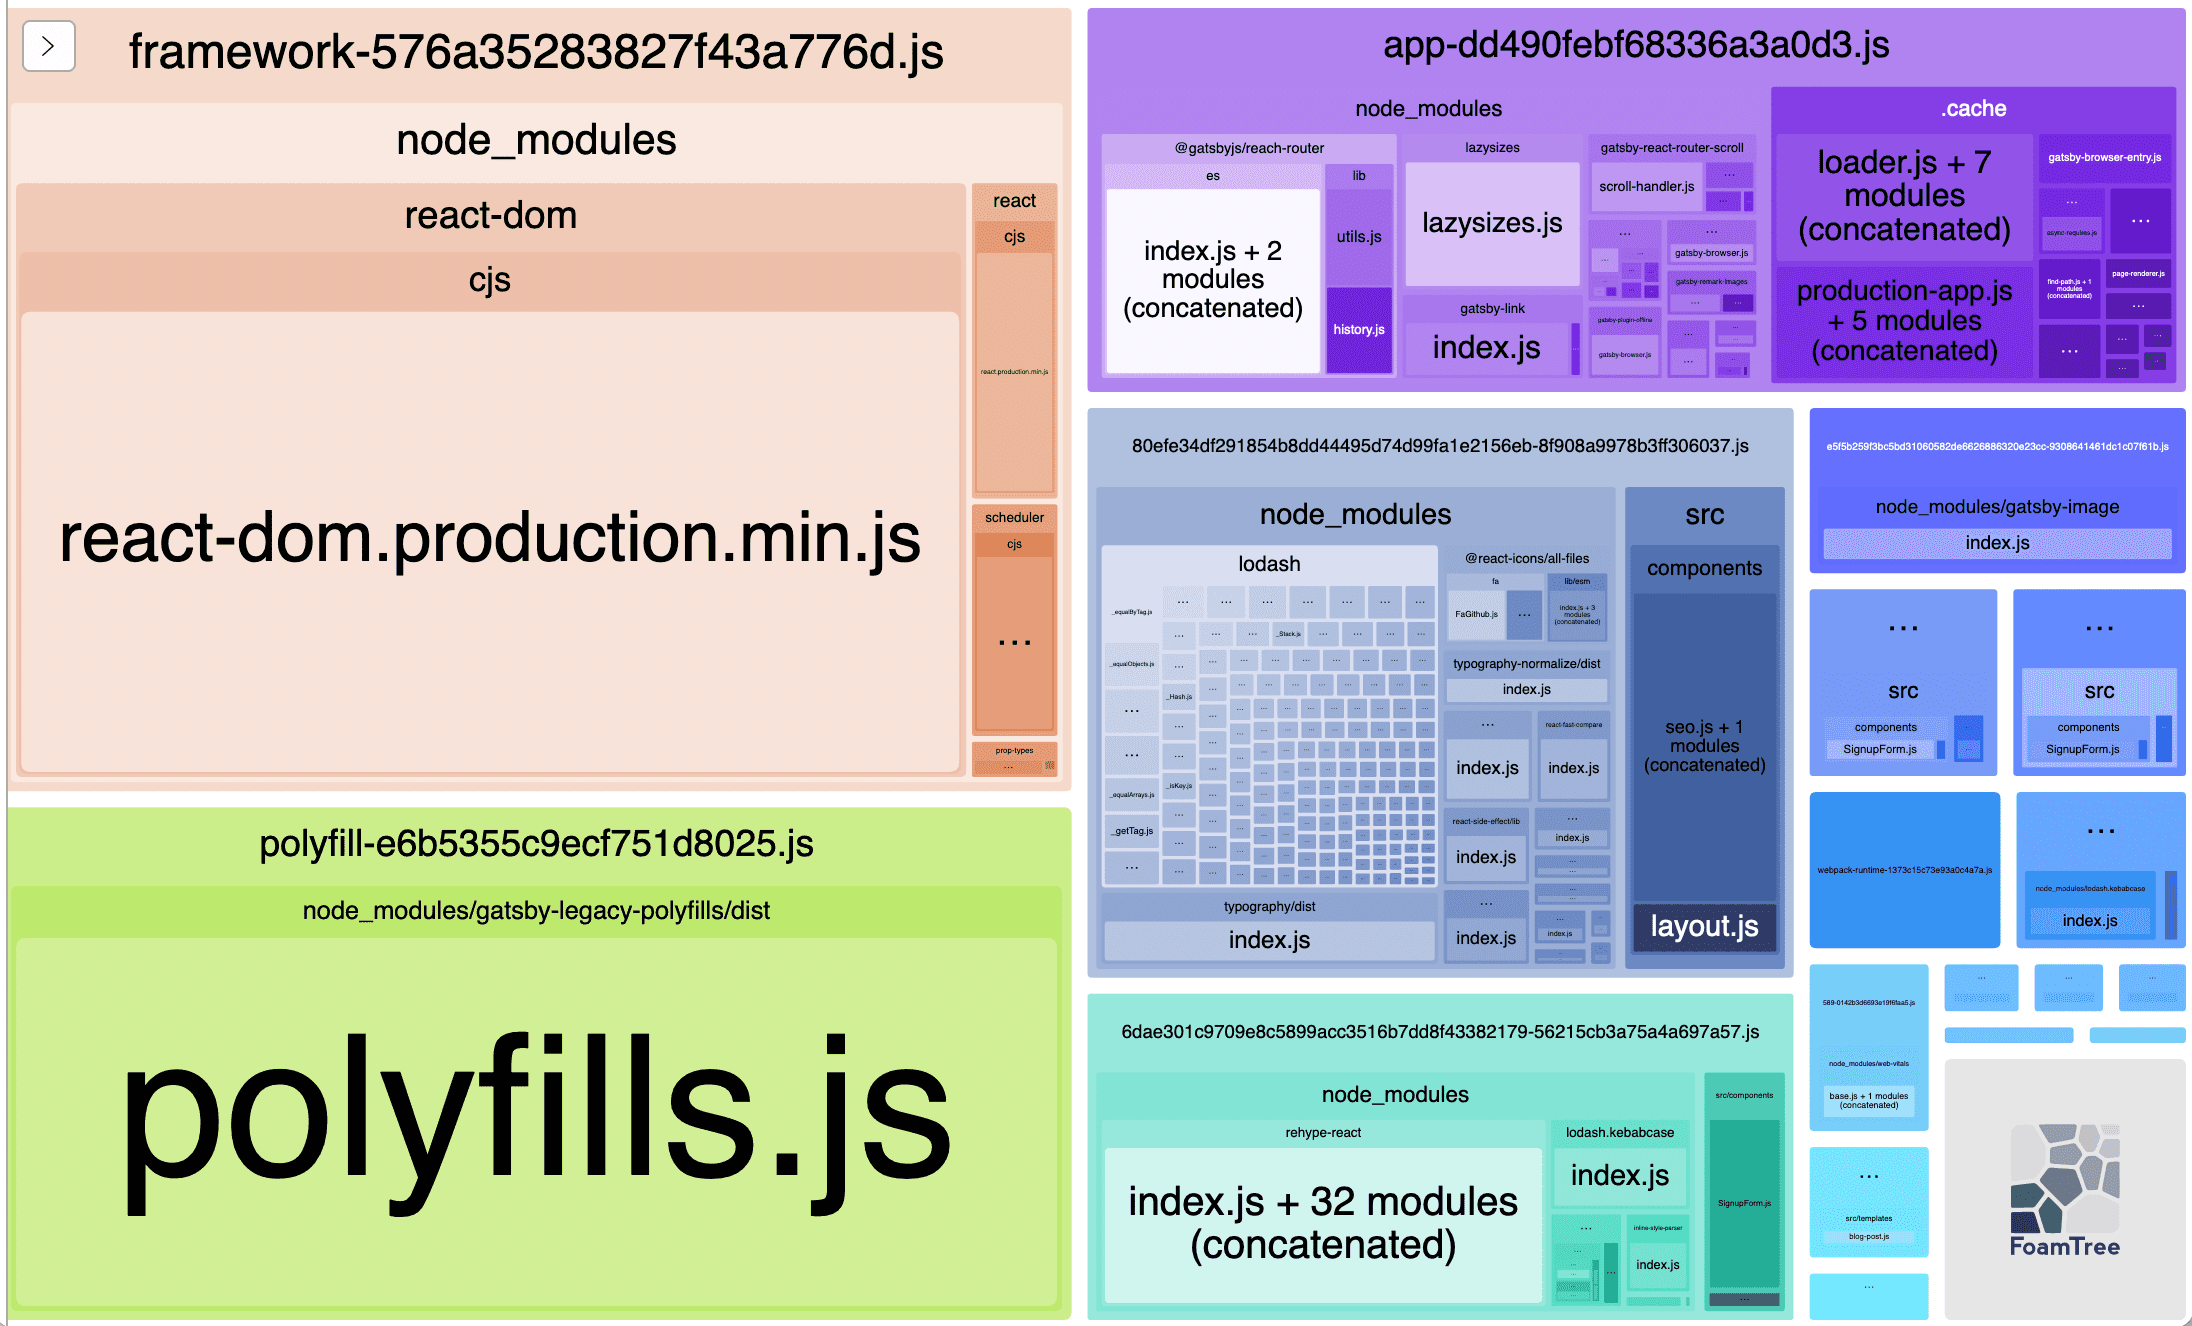
webpack-bundle-analyzer: Plugin that creates a separate web server that gives you a tree map visualization of what's taking up space in your bundle, e.g.:
compression-webpack-plugin: Plugin that gzip compresses your bundle files to serve with Content-Encodingdevtool is a property you can add to webpack.config.js to generate (different kinds of source maps)[https://webpack.js.org/configuration/devtool/] to inspect your bundled non-minified code.- Additional helpful plugins listed here